What is the difference between seed grown and tissue cultured (TC) varieties
Seed: 'USA type' seed cultivars including the likes of Crystal Blush and Garnet Glow are cultivars are from specific rehmanii lineage which have defined characteristics - ie free flowering, generally compact plants, spear shaped leaves with no maculation.
They are ideal for pot plants, but due to shorter flower stems, smaller flower heads and considerably less vase life not always a premium choice for cut flowers.
Many of these varieties are quite true to type from seed; partly due to a lengthy selection process (many years of selecting homogenous plants from a seed line) and also the genetic background; however such seed is not widely available as propagators will retain it for their own production.
TC: Cultivars from the New Zealand (and Dutch) hybridisation programmes come from a much wider gene pool and are all multiplied by TC as not true to type from seed. There can be a huge variance in flower colour and plant habit in the seed collected from even one seed pod of this clonal material.
NZ hybrids tend to have taller stems, larger flower heads, bolder colours and maculated arrow shaped leaves. Initially most cultivars were used for cut flower production, however breeding advances over the past 5 years or so has resulted in natural dwarves (no PGR required), which still have the other characteristics in terms of colour, increased vase/pot life, spotted leaves etc.
How many bulbs do you plant per hectare?
This will depend on whether you are planting outside in the field or in a greenhouse. Normally work on about 70% usage within the greenhouse area (after taking walking space etc) into account. Plant out in metre wide rows and actual density will depend on tuber size. We would normally plant 50-60 2cm T1 tubers per metre. These will produce larger tubers in the second cycle so density will reduce to say 20-25 x 4-5cm diameter tubers.
Tuber spacing per m2 depends on growing conditions, availability of space and grower preference:
1.5cm (< 6) 80 - 100
2cm (6-8) 50 - 60
3cm (10-12) 30 - 40
4cm (14-16) 20 - 30
6+cm (18+) 12 - 15
Some varieties are best planted at lower densities eg. Hot Chocolate® (see photo) is best planted at 9-12 per m2 to acheive maximum light penetration into ther crop and higher flower production
How long does it take from planting to harvest?
The normal plant growing cycle is 24 to 30 weeks, with flowers emerging about 8-10 weeks after planting. This can vary depending on temperature and light.
How long is tuber dormancy?
Tuber dormancy after a full growing cycle is normally 10-12 weeks
If tubers are kept in warm conditions above 20°C , sprouts may emerge on some tubers 5-6 weeks after harvest, however to acheive a unifrom crop some cooling at 8-10°C for up to10- 12 weeks prior to germination can create a much more even crop
Tuber Dormancy & Storage?
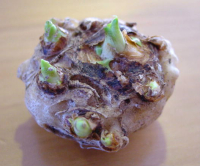
Callas require at least 10-12 weeks tuber dormancy after lifting. Longer term coolstorage is preferable enabling faster germination, consistent shoot emergence & better flower production.
Maintenance of uniform temperature(8-10°C) and good air circulation is the key to good storage. Optimum Relative Humidity (RH): 70-75%.
Penicillium (blue mould), aspergillus and other moulds can occur during storage, especially when humidity rises above 80%. Moulds are caused by a buildup of spores in closed damp conditions and are more prevalent on damaged or cut tubers. Conversely RH below 65% may result in severe dehydration and tuber death ( calcification)
Good air circulation, controlled humidity and even temperature are essential. Addition of extra fans in the coolstore assists air movement.
If moulds occur, either fog the coolstore or remove and spray with with FungiflorTM or Kocide® and dry, preferably in open sunny conditions before replacing in the coolstore. Check coolstore RH is not above 75% to ensure further moulds do not occur.
Length of Storage
Tubers can be stored from 3-12 months. Uniform temperature of 8-10°C and RH of 75% must be maintained throughout the storage period. Good airflow and fresh air replacement from time to time will assist better storage conditions
Longer stored tubers may have some reduction in flower production.
Is it necessary to pregerminate tubers prior to planting?
Pregermination promotes even crop emergence, better Gibberellic Acid (GA) absorption, and shortens the growing cycle. This process is vital if tubers have a short dormancy (10-12 weeks after lift), and when growing in cooler conditions. 
Prior to planting and application of GA, remove tubers from storage and pregerminate at 22-25°C and 85% RH for 7-10 days to trigger emergence of growing shoots.
Stable temperature and humidity throughout this process are critical. Ensure some airflow (use a fan) in the pregermination room. 24 hour lighting appears to help the process.
Smaller 1.5 and 2cm ( T1) tubers have much less ability to withstand temperature and humidity fluctuation - these are normally NOT pregerminated.
Once the growing shoots have emerged a minimum of 5-10mm, apply GA prior to planting.
Which GA treatment is best?
Which Gibberellin?
Use GA3 tablets (eg. Berelex®, Grocel®, DomgibTM) at a rate of 1 tablet per 8-10 litres (100-125 ppm) of water.
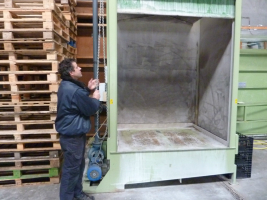
Some growers use liquid Promalin® (GA4, GA7 & 6-Benzyl-adenine) as a dip (3ml/litre 50ppm) for 10-15 minutes or as a spray to the growing points. ie. top side of the tuber (5ml/litre 100ppm). As for GA3, this can be acheived with a hand held pressure sprayer or for large numbers of tubers,a custom made shower cabinet
To enhance flowering many growers apply GA twice. Apply the first treatment post pre germination when soots are emerging. Let the tubers dry off and then re-apply a few days later when shoots are more advanced. Dry off and plant
Fungicides & Insecticide can be added to the GA
Many growers add a broad spectrum protectant fungicide or disinfectant eg. Previcur®N or Sporekill® (Didecyldimethyl Ammonium Chloride) to the GA solution.
In the USA a pre-plant treatment of Champ® or Kocide® (copper hydroxide), Heritage (Azoxystrobin) and Subdue® or Ridomil® (metalaxyl-M) is commonly used.
Other combinations such as Collis® (Boscalid & Kresoxim-methyl), Topsin® (Thiophanate Methyl) and Risolex® have been used successfully.
Addition of an insecticide such as Confidor or Admire (Imadocloprid) will help prevent attack from soil borne insects.
A sticker/spreader/surfactant can be added to the solution to aid absorption. Refresh the dipping solution daily or as required, especially if tubers are dirty.
Is it better to spray or dip with Gibberellic Acid prior to planting?
Spraying is preferable to dipping as it minimises the risk of bacterial or fungal pathogens on the surface of the tuber spreading to other tubers. Spray thoroughly to runoff.
Can GA be applied to T1 tubers?
|
It is very possible to take flowers from T1 tubers however it should be noted that only larger tubers (3cm 10-12 & 4cm 12/14) should be used. Flowering first year T1 tubers will usually have some effect on the T2 production - shorter stems and less flowers. Flowering 2cm tubers is possible but may cause unnecessary stress, onset of disease and will most likely affect the the production of the following crop If flowering T1 tubers it is recommended that only a half rate of GA is utilised ( 50ppm of GA3) |
|
T1 Treasure flowers |
|
Should the GA rate be changed for T2, T3 etc
There is no evidence to suggest any change in GA application rate for older tubers in successive cropping cycles ( T2,T3 etc)
Key points to watch
1. Ensure any diseased or calcified ( chalky) tubers are removed
2. Pregerminate (uniform temp 24°C and humidity 90% for 7-10 days) so sprouts are beginning to emerge
3. Spray to runoff with 100ppm GA plus fungicide/insecticide mix
4. Allow to dry
5. Plant within 1-2 weeks as GA effect can wear off over time.
What is the production in stems per hectare given the optimum growing condition?
A first year T1 2cm tuber will produce 1 flower but some varieties like Hotshot (orange) will produce 2 and even 3 flowers. A 4-5cm tuber will produce 3-4 flowers (also taller and larger heads). Production is highly correlated to plant density, nutrition, light and temperature.
Flowers - how to harvest?
Harvest flowers in the cool morning. In dry conditions irrigate prior to harvest. Flowers are pulled rather than cut to ensure the longest possible stem length. Do not cut base of stems at this stage in the field.
Place dry flowers flat in boxes/trolleys for immediate transfer to coolstore prior to grading. Ensure boxes are covered in transit to avoid contamination.
Place harvested stems, dry in cool store at 6-8°C for pre-cooling prior to grading. Stems can stay dry for up to 6-8 hours without any damage.
Stems may be dipped in clean, treated water (add bacteriostat eg. chlorine) to remove any soil or media.
Dip flower heads in a solution containing fungicide Rovral® and insecticide eg. Ripcord® to remove any insects and provide post harvest protection Gently shake to remove excess moisture.
Absolute attention to hygiene is vital at all stages of the picking process. All grading areas and buckets must be regularly scrubbed with chlorine based bleach or sanitiser prior to grading.
Flowers - Grading & Post Harvest?
After pre-cooling, grade by length (see photo) and bunch (5 or 10 stems) as per market requirements.
Cut stems with a clean sharp blade in the basal white part of stem to help avoid splitting and roll-up of the stem. Clean and sanitise buckets after every use to avoid bacterial contamination and potential slimy stem.
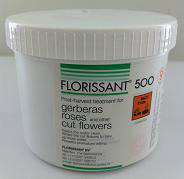
Prepare a hydration solution of clean water* and KeystreptoTM (streptomycin), EnhanceTM (2-3ml/20l of water), Floralife®200 (10ml/20l of water) or a chlorine based product such as Florissant®500 (one tablet per 3l of water) to protect against slimy stem and increase vase life. Do not use sugar based preservatives. * chlorinated water is best to destroy any bacteria

Place bunched stems in the solution at ambient temperature as chilled water may cause splitting and roll-up of the stem. Hydrate for a minimum of 2-3 hours at room temperature (80% of uptake occurs in the first two hours) prior to cool storage and packing.
Flower stems can stay in this solution for up to 48 hours - recut and place in fresh solution for longer storage.
Fumigation for phytosanitary assurance, can take place prior to cool storage and final pack out.
Coolstorage
Cool store flowers at 6-8°C, minimum 80% RH prior to packing. Ensure flowers are down to cool store temperature prior to dispatch (a minimum of 2 hours after packing). Use refrigerated/cooled transport.
Scrub out cool store with biocide regularly to help prevent build-up of bacterial and fungal spores that may ruin quality flowers.
